Nodes: Target Reticles
This node rig generates a target reticle. There are six different reticle types based on this Wikipedia page (so if there are errors, either fix them or complain to Wikipedia!).
What it does is to display a target reticle. You can select between six different types and alter various parameters. It is done entirely with scene nodes and I think shows the power of the node system to create what in this case would need a formal ObjectData plugin written in C++ or Python. It is, of course, true that you could easily create any of these objects in a couple of minutes but they would not be parametric; you'd need to edit the models to change any features. The advantages of using nodes are:
- the objects are fully parametric, no need to edit underlying objects
- no need to build separate plugins for PC and MacOS platforms
- you only need one node setup, not six different models
- best of all, if a user knows to use the scene nodes it's easy for them to add features and/or additional parameters, which could never be done with a plugin
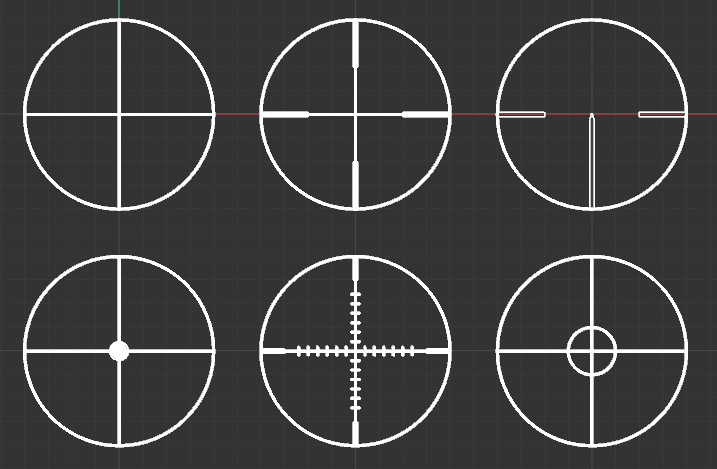
Essentially, what the nodes do is generate a series of splines, then make them renderable by using Sweep or Extrude nodes, plus one or two mesh objects. The reticle types are these:
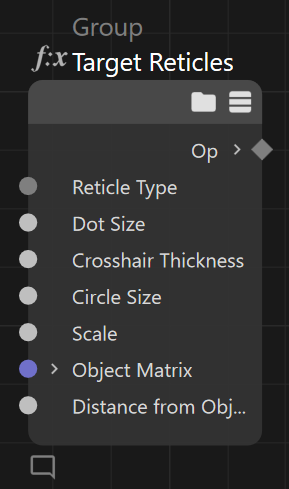
The available controls from the topmost group node are:
Using the object
I've deliberately left this as a .c4d file rather than making it into a capsule because it's easier to distribute. To add it to a scene, open the file, copy the single group node 'Target Reticles' then in your scene open the node editor, ensure that is in scene node rather than material mode, and paste the copied group node into the editor. Hook it up to the scene root and it will appear in the viewport.
You could of course make this into an asset which would then be easier to use than having to load a separate file.
Settings
Reticle Type
The type of reticle. These are actually based on the first six reticles from this Wikipedia article: https://en.wikipedia.org/wiki/Reticle so if there are mistakes in that, feel free to fix them in this rig.
Dot Size
Only applies to the reticle type 'Target Dot'. This will alter the size of the central dot.
Crosshair Thickness
The thickness of the outer circle which is present in each reticle type, and of the crosshair lines. If the reticle type is 'Duplex Crosshair', 'German Reticle', or 'Mil-Dot' then the thicker lines in the crosshairs will be scaled up down accordingly.
Circle Size
Only applies to the reticle type 'Circle'. This will change the size of the inner circle.
Scale
Changes the scale of the entire object.
Object Matrix
When created the reticle is located at the centre of the 3D world, so there needs to be some way to change its position, since you can't move it in the viewport as you can with a conventional object. To do this, add an object (a Null object is fine) to the scene then drag it into the node editor. Link that object's global matrix to the 'Object Matrix' port and when you move or rotate the object in the viewport the reticle will move and rotate with it.
Distance from Object
This setting will move the reticle this distance along the Z-axis. This is either the Z-axis of the linked object if there is one (see 'Object Matrix' above) or the 3D world.
What is the point of that? One thing you might want to do is add a camera to the scene, then drag it into the node editor and link its global matrix to the 'Object Matrix' port. As the camera moves/rotates, the reticle will move with it, so that you are looking through the reticle at the scene when the camera moves. However, depending on the camera you probably won't see the reticle if the camera is active, so to ensure that it is always visible, change this setting. This will move the reticle along the camera's Z-axis and it will then become visible. Then when the camera moves it's as though you are always looking through the reticle at the viewport (the camera has to be the active camera for this to work, of course).
Download
Important: this setup was built with Cinema 4D 2023.2.1. It may not work on earlier versions due to the changes in the node system.
I've deliberately left this as a .c4d file rather than making it into a capsule because it's easier to distribute. To add it to a scene, open the file, copy the single group node 'Target Reticles' then in your scene open the node editor, ensure that is in scene node rather than material mode, and paste the copied group node into the editor. Hook it up to the scene root and it will appear in the viewport.
You could of course make this into an asset which would then be easier to use than having to load a separate file.
![]() Download Target Reticles node rig (.zip file, 52K)
Download Target Reticles node rig (.zip file, 52K)
Page last updated July 23rd 2023