Notarizing a Mac plugin in macOS Catalina or later
Warning: this page refers to using the command 'xcrun altool --notarize-app ...' to submit a plugin for notarizing. This no longer works in 2024 or later (that is, the year 2024, not 'Cinema 4D 2024'). Instead, Apple requires that you use a new command, 'xcrun notarytool submit ...' instead. This command is included in Xcode 13 and later, but if you need to use an earlier version of Xcode, you will need to obtain the tool separately. This article from Apple describes how to obtain and use the notarytool. This page is still relevant up to section 5. For how to submit a plugin using notarytool, see my more recent article here.
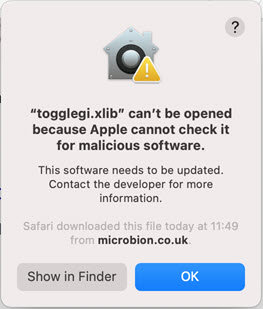
If you only a build a Mac plugin to use yourself and don't want to give it to others, you don't need to worry about this. On the other hand, to distribute the plugin more widely you do need to worry about it (and it's a massive PITA when all you want to do is give away a small plugin). If you distribute a plugin which hasn't been notarized, potential users will see this after downloading and installing it:
The MAXON SDK docs explain the process fairly well but miss out a number of things it would be useful to know.
This page is really written for me, because it's the sort of thing I'll never remember when/if I have do it again. But others may find it useful too, so here it is.
Note: I'm assuming you do all this from scratch and aren't automating it. It's probably easy enough to do that, but to really understand what's going on, you need to go through the painful process of getting your plugin notarized step by step.
Note 2: again, I assume that you have your plugin built and up and running locally and now want to notarize the final version for distribution.
1. Apple Developer account
You will absolutely need an Apple Developer account for this process. It isn't a separate account, what it does is attach the correct credentials to your existing Apple ID (which you almost certainly already have, but if not you will need to open one first).
Unfortunately, it is not free to add the developer credentials but I think it is worth it if you develop plugins for Cinema 4D or any other macOS or iOS software. Not only does it give you access to the notarization program but with it you can download older versions of software such as Xcode and macOS itself - useful if you want to develop plugins for older versions of C4D, for example. I currently have a dual-boot system with either macOS Mojave plus C4D R19 and Xcode 10, or macOS Big Sur plus C4D R23 and Xcode 12. You can get the older versions with your Apple Developer account.
When you open the developer account - or if you already have one - ensure that you enable two-factor authentication (2FA). We'll see why later.
Once you have done this, you need to tell Xcode about the account. Open the Xcode preferences, go to the account tab and add the account (which is just your Apple ID). It will look like this when you do:

2. Add a developer certificate
The Maxon SDK documentation explains this well, so to summarise briefly, you do the following steps:
2a. With the Xcode preferences window and the Accounts tab open, and the Apple ID you want to use selected, click 'Manage Certificates...'. When the panel appears, click the '+' button and from the drop-down menu, select 'Developer ID Application'. This is very important - don't select one of the other options:

2b. If you only have one developer ID the certificate will be added to the panel:

3. Other preliminary stuff
When you come to submit the plugin to Apple's automated notarization process, it will want three pieces of information. These are the bundle ID, the app password and your provider ID. So you have to get those first.
3a. The bundle ID
This is easy, you can just make one up. It's used to identify the app so as to ensure that you and Apple are talking about the same thing. I would suggest using the same ID value as used in the projectdefinition.txt file (see this page). For example, if I was going to notarize the ToggleGI test app used elsewhere on this site, the ID in the projectdefinition.txt file would be 'uk.co.microbion.togglegi'.
3b. The app password
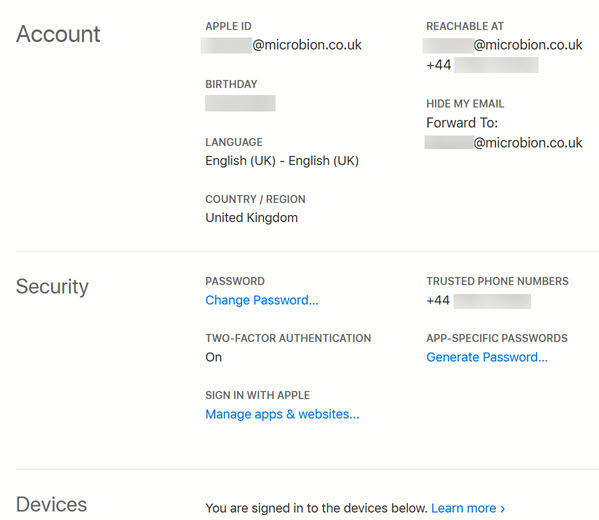
You have to get this from Apple. It's a password unique to you so only you can submit your app for notarization. To get this, sign into your Apple ID account (confusingly, NOT the Apple developer site, the regular Apple ID site at https://appleid.apple.com). You'll need your Apple ID and it will send a code for two-factor authentication (see above).
Once you are signed in, you should see your account details and there is a security section which looks like this in my account:
Click 'Generate Password...' and this window appears:

Type in a label of your choice - it can be anything, it's just to identify to you which password is used for what purpose. Click 'Create' and the password is generated. It will look something like this:
abcd-efgh-ijkl-mnop
That is not a genuine password, but it will look like that. Write it down because you won't be able to recover it - if you forget it, you'll need to generate another one.
3c. The provider ID
This also comes from Apple. You can get it by using the command-line Xcode tool altool in a Terminal window. The command line looks like this:
xcrun altool --list-providers -u [Apple id] -p [app password]
Here, the [Apple ID] is your Apple ID, and [app password] is the password you generated in step 3b.
After a few seconds you should get something like this from Apple (some details obscured):

What you need is the 'Provider Short Name'. Make a note of it. As far as I can see, you only need to do this once and then use the same provider ID for all future projects (this assumes you're a single developer, you might have multiple IDs if working in a team).
4. Sign the code
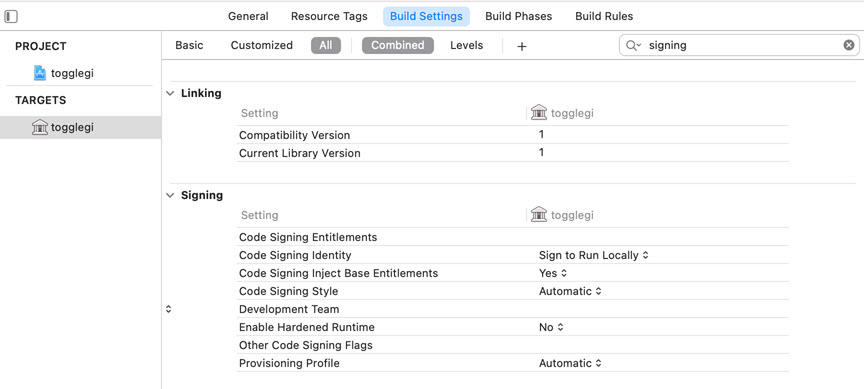
You do this in Xcode. Open the project, select the target and navigate to the 'Signing' section. You will see this:
You need to change some of the settings there.
4a. Code Signing Identity
This is confirming who is signing the code. As long as you did step 2 correctly, you can select your developer certificate from a drop-down menu.
4b. Development Team
Not really applicable if you're a single developer but in a large company there might be more than one development team. In any case, just select the team (which could be just your name) from the menu.
4c. Enable Hardened Runtime
This adds extra security to the binary. You must change this to 'Yes' - it's 'No' by default. If you don't, the notarization will fail.
4d. Code Signing Inject Base Entitlements
This is set to 'Yes' by default, which allows a way round some security aspects of macOS to allow debugging. It must be turned off (set to 'No') or the notarization will fail.
4e. Other Code Signing Flags
This one can catch you out. Each app to be notarized must include a secure timestamp. Apple says that if you notarize an app through Xcode this is added automatically. Unfortunately, Xcode doesn't seem to recognise C4D plugins as ''proper" executables and won't let you upload the plugin to Apple from within Xcode itself, so this step has to be done manually.
To add the timestamp, expand this section so that you see options for Debug and Release. In the Release section, enter this:
--timestamp
Once complete, the signing settings look like this:

5. Upload the plugin to Apple for notarization
First, build the plugin for release. The Maxon SDK docs suggest that you do this by building it using Product->Build For->Profiling but a simple release build seems to do just as well.
Then create a .zip file containing the plugin and any other files it needs (e.g. the 'res' folder). I did this by creating a separate 'Notarize' folder then a folder within that for each plugin to be be notarized. Then you can create a .zip by using the command line as shown in the SDK docs. Mine looked like this when I wanted to notarize the 'ToggleGI' plugin:
/usr/bin/ditto -c -k --keepParent "/Users/steve/Documents/C4D_Plugins/Notarize/ToggleGI" "/Users/steve/Documents/C4D_Plugins/Notarize/ToggleGI/ToggleGI.zip"
The first parameter you supply is the path to the folder containing the plugin binary and the second parameter is the name of the .zip file to create.
Now you have a zip file containing the signed plugin, you need to upload it to Apple. This is yet another command line and it's a nice long one for you:
xcrun altool --notarize-app --primary-bundle-id [the bundle ID] --username [Apple ID] --password [app password] --asc-provider [provider ID] --file "/Users/steve/Documents/C4D_Plugins/Notarize/ToggleGI/ToggleGI.zip"
The [bundle ID] is from step 3a above, [app password] from step 3b, and [provider ID] from step 3c.
If it works, you should see this in the Terminal window after a few seconds:
No errors uploading  '/Users/steve/Documents/C4D_Plugins/Notarize/ToggleGI/ToggleGI.zip'.

	    RequestUUID =  c55xxxxx-xxxx-xxxx-xxxx-xxxxxxxxx1ef
Don't lose the 'Request UUID'. You'll need it if you need to query anything about the notarization process. (I've replaced some digits with 'x' just in case.)
6. Wait for the result
After a time - could be a minute or two to several hours, depending on the server - you'll get an email from Apple sent to your Apple ID email address. This will tell you if it worked or not. If it didn't you'll see this:
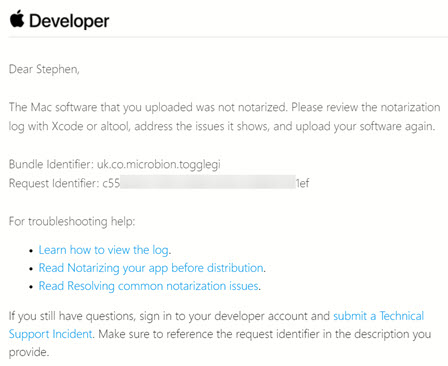
Now why can't Apple tell you what the problem was in this email? All it says is that it didn't work. Very helpful. To find out what the problem was, you can run the altool again. This time, run this command in Terminal:
xcrun altool --notarization-info [Request UUID]-u [Apple ID] -p [app password]
You see now why you needed that UUID number. The response you get is almost as useless as the email. You see something like this:
 Date:  2021-07-07 13:34:18 +0000

Hash:  b82e3ba09f226f2e9babf642c317f1f1e41f624060fec9ab28192f1941126a80

LogFileURL:  https://osxapps-ssl.itunes.apple.com/itunes-assets/Enigma125/v4/4e/50/ac/4e50acaf-5b73-5daf-4831-[very. very long URL follows!]

RequestUUID:  c55xxxxx-xxxx-xxxx-xxxx-xxxxxxxxx1ef

Status: invalid

Status Code: 2

	  Status Message: Package  Invalid
'Package Invalid'. That helps so much. However, crucially there is a URL! Copy that - it's very long - paste it into Safari, and then you see an actual readable report like so:

As you can see, the error was that a secure timestamp hadn't been added. To fix it, you would go back to section 4e, add the flag, rebuild the plugin and repeat section 5 again.
7. Fixing an 'Invalid Developer ID' error
Sometimes, you seem to have done everything correctly but the notarization service tells you that it has failed due to an invalid developer ID, and possibly other errors such as a missing timestamp as well. If this happens, open a terminal window where the plugin binary is located and type this:
codesign -d -vvv [plugin binary name]
You'll get a lot of information but look down and you might see something like this:
CDHash=f60e2a4bfc6947ded5dfb6f619f4b05ecf32a41e
Signature=adhoc
Info.plist=not bound
TeamIdentifier=not set
The 'Signature=adhoc' line indicates that the binary wasn't signed even though Xcode should have done it. In that case you can sign it manually by entering this:
codesign -f -s "Developer ID Application: [your developer ID]" [plugin binary name]
If you then repeat the first codesign command above, with luck you will see this:
CDHash=e003085601d93cdfa5418c72d9327960ed5917d3
Signature size=8978
Authority=Developer ID Application: Stephen Pedler [your certificate ID]
Authority=Developer ID Certification Authority
Authority=Apple Root CA
Timestamp=8 Dec 2021 at 11:18:42
Info.plist=not bound
TeamIdentifier=[your team ID]
Now you can see that the binary is signed by you as the developer and it now has a valid timestamp (which implies that the binary won't be timestamped if it hasn't been signed correctly). If you submit it again to Apple the problem should be fixed.
This problem can occur if, for some reason, you have the same developer ID more than once in your keychain. If that happens codesign won't know which one to use, and when you try to sign the plugin, it will tell you that the developer ID is ambiguous. If that happens, you will need to edit your keychain to remove the duplicate entries. There are plenty of pages on the web showing how to edit and delete keys and certificates.
7a. Fixing Error 1048
(April 2022) Apple have added a nice new hoop for you to jump through, in case you didn't have enough already. When you upload your plugin to be notarized, the upload may fail with this error:
Error 1048: You must first sign the relevant contracts online
The usual reason for this is that Apple have changed the developer agreement and until you accept it, you won't be able to notarize any plugins (or any other software for any Apple OS). All you need to do is sign in to your developer account and it will tell you that there are new agreements to review. Once you accept them, you will be able to upload your plugin to be notarized.
8. It's alive!
Finally, it will all hopefully work and then you get this from Apple:

At long last you can distribute the plugin to others.
Do bear in mind that, if you ever have to rebuild the plugin, you will have to notarize it all over again.
This process is slow and awkward though there are ways such as scripts to part-automate it. But if you are, like me, writing plugins on Windows then porting them to a Mac, it isn't too bad once you know what you are doing.
Page last updated September 25th 2024